-
A well-installed roof dramatically enhances both the appearance and value of your home, making it look polished and well-maintained.
-
Proper preparation, including tools, safety gear, and deck inspection, is essential for a successful roofing project.
-
Step-by-step installation, from removing old shingles to placing ridge shingles, ensures durability, water resistance, and a professional finish.
-
Ventilation, gutters, and drainage play a crucial role in extending roof lifespan and protecting the home’s foundation.
-
Attention to color, architectural style, accents, and clean lines maximizes curb appeal and integrates the roof seamlessly with the home’s exterior.
-
Regular maintenance and inspections help prevent leaks, damage, and costly repairs, ensuring the roof remains functional and attractive over time.
A roof is more than just a protective layer over your home—it’s a statement piece. The right shingles can transform a house from plain to striking, instantly boosting curb appeal. Beyond aesthetics, a well-installed roof improves energy efficiency, prevents leaks, and protects your home for years to come. This guide walks you through every step, from preparation to maintenance, ensuring your roofing project is successful and long-lasting.
Why Your Roof Matters for Curb Appeal
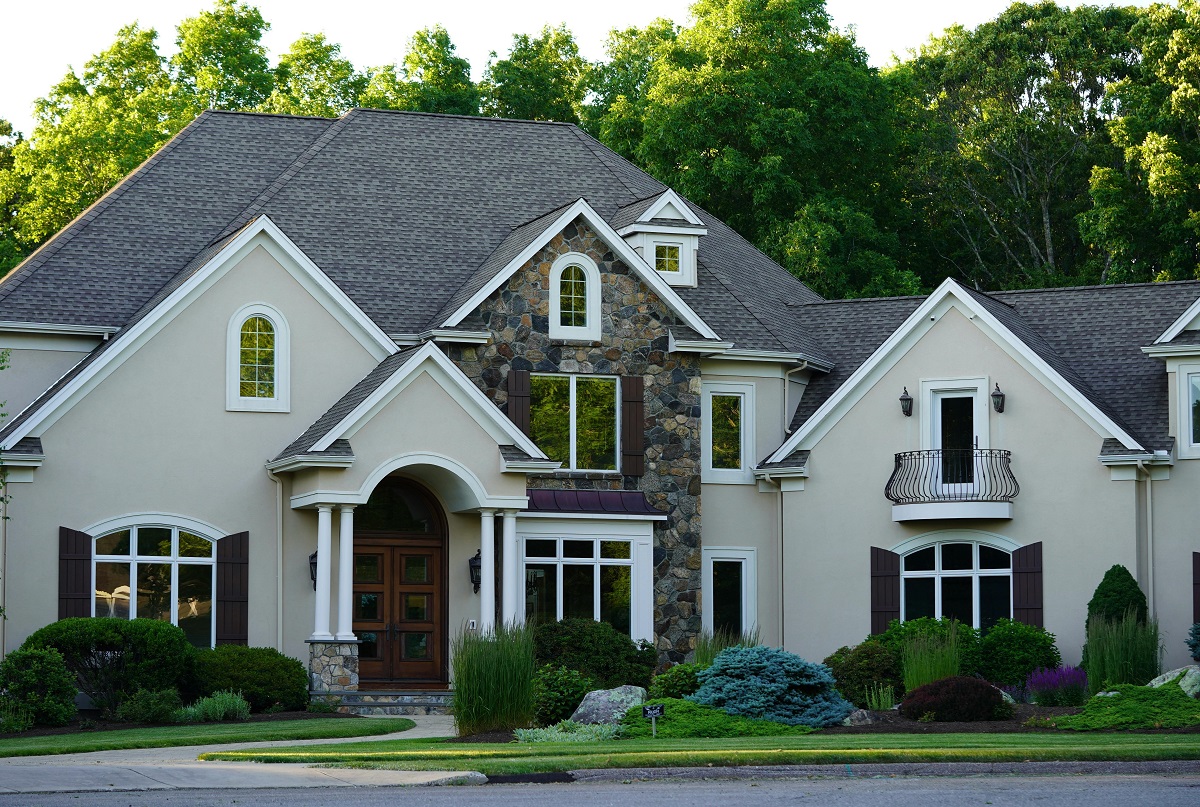
A home’s exterior tells a story. Even if your landscaping is immaculate and your paint job flawless, a damaged or outdated roof can dramatically reduce your home’s visual appeal. New shingles make a home look refreshed, polished, and well-maintained.
Beyond aesthetics, a new roof offers practical benefits:
-
Enhanced insulation: New shingles and proper underlayment can improve energy efficiency by keeping your home cooler in summer and warmer in winter.
-
Fewer leaks: Replacing worn shingles reduces the risk of water damage.
-
Reduced emergency repairs: A new roof minimizes unexpected issues and expensive fixes.
-
Increased property value: A clean, modern roof can raise your home’s resale value and attract potential buyers.
Understanding your roof’s components—decking, underlayment, shingles, flashing, and gutters—allows homeowners to make informed choices that balance both beauty and function.
What You’ll Need Before You Start
Preparation is key for a successful roofing project. Here’s a detailed checklist of tools and materials:
-
Roofing shingles: Select based on your home’s style, climate, and desired lifespan.
-
Roofing nails and nail gun: Ensure you have the correct length and type of nails for your shingles.
-
Roofing underlayment: Provides an extra layer of protection beneath shingles.
-
Roof ladder or scaffolding: Safe access is critical, especially for steep roofs.
-
Chalk line: Keeps rows straight for a professional finish.
-
Utility knife: For cutting shingles precisely along edges and valleys.
-
Hammer and pry bar: For removing old shingles and any damaged nails.
-
Safety gear: Gloves, goggles, non-slip shoes, and a harness to prevent falls.
Proper preparation ensures not only safety but also efficiency. Double-check weather forecasts—shingling in dry, mild conditions prevents slipping hazards and ensures shingles adhere properly.
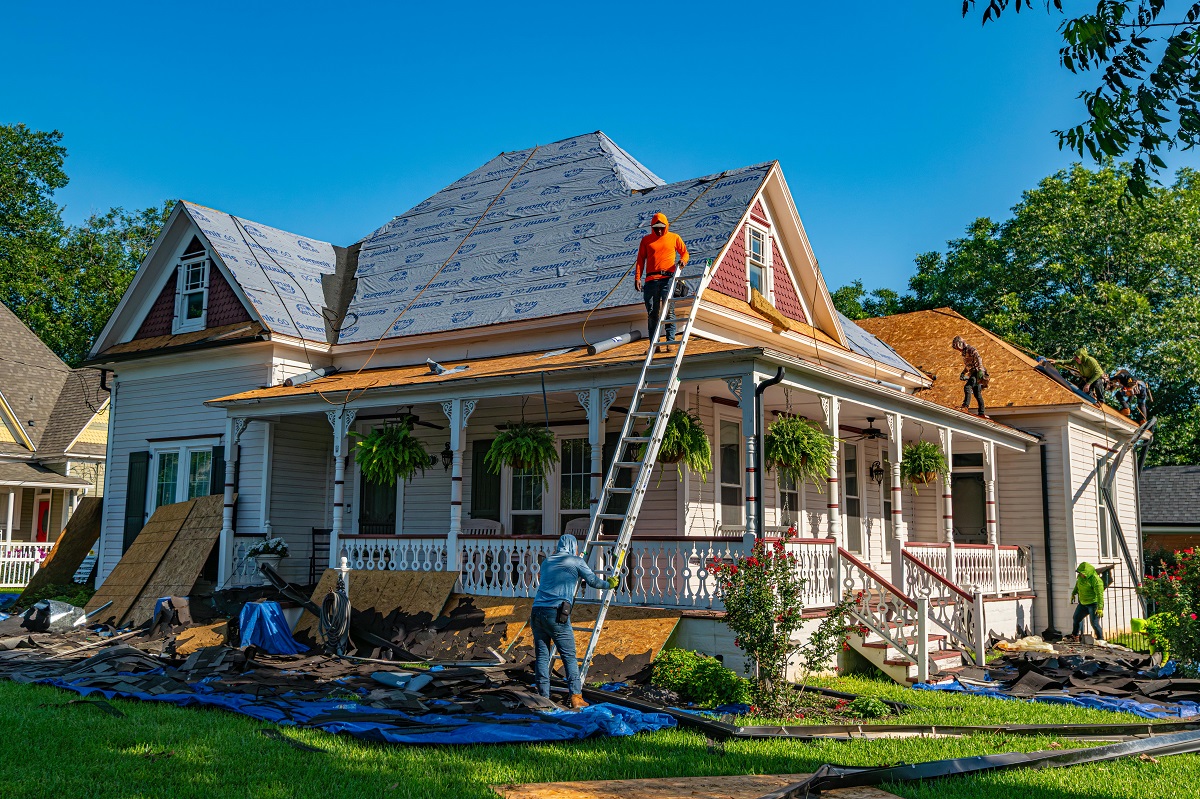
Step 1: Inspect the Roof and Remove Old Shingles
Before installing new shingles, assess your existing roof. Signs that replacement is necessary include:
-
Broken or curling shingles: These can allow water penetration.
-
Water stains indoors: Suggest leaks and potential mold growth.
-
Moss or algae growth: Can compromise shingle integrity.
-
Decking damage: Rot or warping beneath shingles must be addressed first.
Once inspected, carefully remove old shingles using a pry bar. Pull nails and lift shingles without damaging the underlying deck. Proper disposal of debris prevents accidents and keeps your workspace safe. If any deck boards are damaged, replace them to ensure a solid foundation for the new roof.
Step 2: Prepare the Roof Deck
A smooth, clean roof deck is essential for shingles to lay flat and adhere properly. Here’s how to prepare:
-
Sweep debris: Dust and leaves can prevent underlayment and shingles from lying flat.
-
Repair weak spots: Replace rotted or uneven boards to prevent sagging.
-
Install roofing underlayment: This extra layer protects your home from leaks, ice, and wind damage. Roofing underlayment options include felt, synthetic, and peel-and-stick varieties. Each has pros and cons—synthetic underlayment is lighter and more durable, while felt is traditional and cost-effective.
Installing underlayment correctly ensures long-term protection and reduces the chance of water intrusion under your new shingles.
Step 3: Install Drip Edge and Flashing
Drip edges and flashing are crucial for directing water away from vulnerable roof areas.
-
Drip edges: Install along eaves and rake edges to prevent water from seeping under shingles.
-
Flashing: Place around chimneys, vents, valleys, and skylights to prevent leaks.
Proper installation of these components is essential for long-term roof repair solutions, as they prevent rot, water damage, and costly repairs down the line.
Step 4: Choosing the Right Shingles
The type of shingles you select impacts both aesthetics and roof longevity. Consider:
-
Asphalt shingles: Affordable and widely available, offering reliable protection.
-
Architectural shingles: Thicker, textured, and visually appealing, with longer lifespans.
-
Metal shingles: Durable, energy-efficient, and long-lasting but more expensive.
-
Wood or slate shingles: Premium options that provide unique looks but may require specialized installation.
To boost curb appeal, choose the best shingles that complement your home’s siding, trim, and roofline. Colors, texture, and style all influence how polished your home will appear from the street.
Step 5: Laying the Starter Strip
The starter strip provides a foundation for the first row of shingles.
-
Place the strip along the bottom edge of the roof, adhesive strip facing up.
-
Align with the drip edge to prevent water intrusion.
-
Ensure the row is perfectly straight—any crooked placement will compound as you continue.
A properly installed starter strip helps your shingles stay in place and withstand wind and weather.
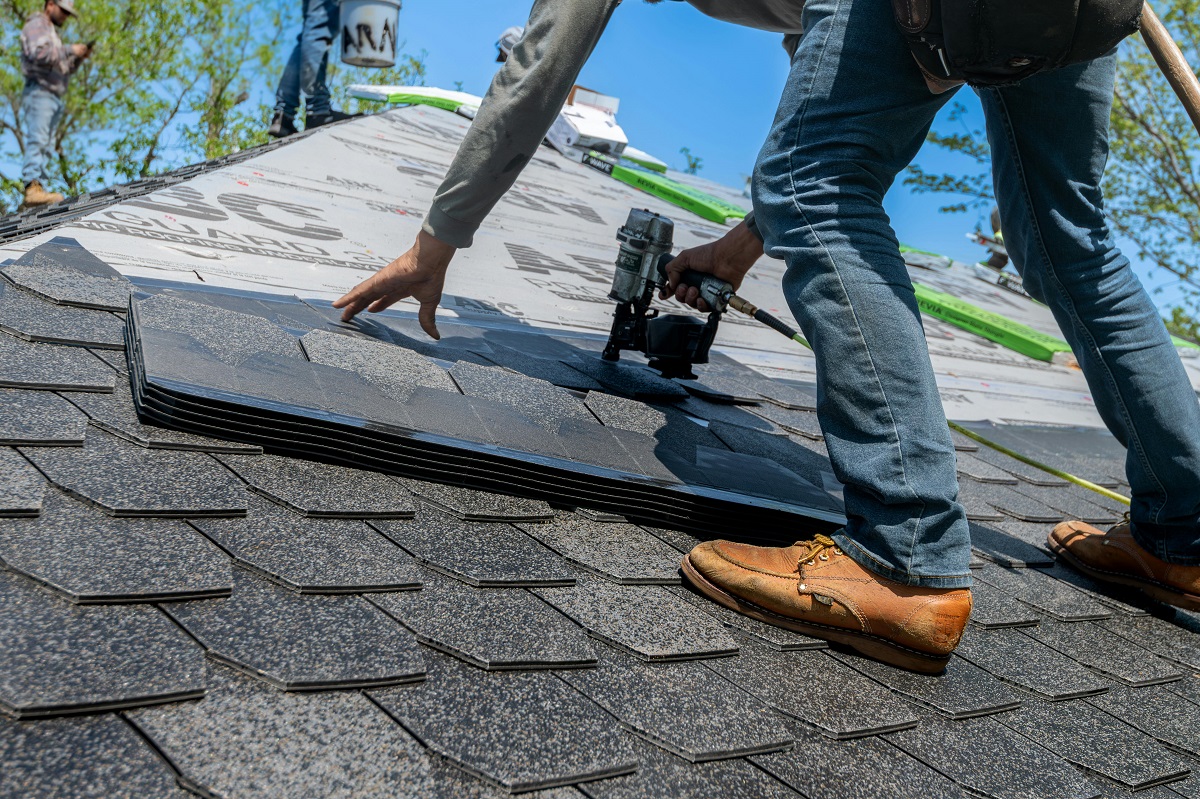
Step 6: Step-by-Step Shingle Installation
Shingling requires careful attention to detail. Follow these steps:
-
Begin at the lower left corner of the roof.
-
Nail the first shingle according to the manufacturer’s instructions.
-
Stagger shingles to prevent lining up seams, which can leak.
-
Cut shingles to fit edges, chimneys, or valleys using a utility knife.
-
Use a chalk line to maintain perfectly straight rows across the roof.
-
In valleys, overlap shingles for added water protection and secure with extra nails.
-
Finish with ridge shingles at the top for a polished, weatherproof edge.
Correct spacing, alignment, and nail placement are crucial to avoid leaks and maximize durability. Double-check measurements frequently to prevent mistakes.
Step 7: Roof Ventilation and Gutter Installation
Ventilation and drainage are vital for a long-lasting roof.
-
Roof ventilation: Install ridge vents, soffit vents, or gable vents to prevent heat buildup and ice dams.
-
Gutters: While it may seem separate, choosing gutters that effectively direct water away from the foundation complements your roof. Properly aligned gutters protect siding, landscaping, and basement areas from water damage.
Integrating ventilation and drainage solutions maximizes the lifespan of your roof and keeps your home protected.
Step 8: Inspect Your Work
After shingles are installed:
-
Inspect for gaps, lifted edges, or misplaced nails.
-
Walk the perimeter carefully, using a ladder rather than stepping on shingles.
-
Correct any issues immediately to prevent leaks, water damage, and expensive repairs.
A thorough inspection now ensures your investment will last for decades.
Step 9: Clean-Up and Maintenance Tips
Post-installation maintenance preserves your roof and enhances curb appeal.
-
Remove leftover nails, debris, and packaging.
-
Consider applying a roof sealant if recommended.
-
Schedule semi-annual inspections to identify minor issues before they escalate.
-
Remove debris, moss, and leaves to prevent water retention.
-
Repair small damage promptly.
These steps contribute to long-term roof repair solutions, ensuring your roof stays functional and attractive for years.
Tips for Boosting Curb Appeal While Shingling
Your roof is one of the first things people notice about your home. While a new shingle installation naturally improves the look, there are several strategies you can use to maximize curb appeal and make your home stand out even more. Paying attention to color, style, and finishing details can transform a simple roof replacement into a major aesthetic upgrade.
Color Coordination
The color of your shingles sets the tone for your entire home’s exterior. When selecting a shade, consider your siding, trim, and even landscaping. Some tips:
-
Complement your siding: Choose shingles that harmonize with your house’s exterior color rather than clash. For instance, dark gray shingles pair well with white or beige siding, while brown tones complement earthy hues.
-
Match your architectural style: Traditional homes often look best with muted, classic colors, while modern homes can handle bolder tones.
-
Consider seasonal changes: Lighter-colored shingles reflect heat in summer and can brighten the look of your home during darker winter months.
Color coordination helps create a cohesive look that draws the eye naturally to the roof and enhances overall street appeal.
Architectural Style
The shape, texture, and layering of shingles can elevate your home’s visual interest.
-
Dimensional shingles: These multi-layered shingles create shadows and depth, making a flat roofline appear more dynamic.
-
Textured shingles: Varied textures can give your roof a handcrafted or premium look.
-
Architectural accents: Features such as roof peaks, dormers, or gables can be highlighted with specialty shingles for an upscale appearance.
Choosing the right architectural style can make your home appear larger, more sophisticated, and thoughtfully designed.
Accents
Small details can have a big impact. Adding accents around your roofline can create a polished, professional look:
-
Ridge caps: These finish the roof edges neatly and protect against water infiltration while adding visual definition.
-
Metal flashing: Polished or colored flashing around chimneys, vents, and valleys can complement your shingles and siding.
-
Contrasting elements: Using a slightly darker or lighter shade of shingles for certain areas, like hips or ridges, can subtly highlight architectural lines and create visual interest.
Accents help break up monotony and draw attention to your roof’s craftsmanship.
Clean Lines
Curb appeal isn’t just about colors and textures—it’s also about precision and alignment. Small misalignments or cluttered elements can make even the most beautiful roof appear sloppy:
-
Gutters and downspouts: Ensure they are straight, secure, and painted to match trim or shingles if necessary.
-
Roof vents and plumbing stacks: Position vents strategically and align them with roof rows for a tidy look.
-
Edges and valleys: Make sure shingles are cut cleanly and overhangs are uniform.
Maintaining clean, precise lines gives your home a professional, finished appearance that makes the roof—and your entire exterior—look intentional and well-maintained.
Landscaping and Integration
Don’t forget how your roof interacts with the rest of your home’s exterior:
-
Contrast with greenery: Shingles should complement trees, shrubs, and flowers, not blend into them.
-
Highlight focal points: If you have a porch, bay window, or garden feature, choose shingle placement and color to frame these areas attractively.
-
Balance proportions: A well-chosen roof can visually balance your home’s height, shape, and mass, making the property look more inviting from the street.
By integrating the roof with the surrounding environment, you create a seamless, aesthetically pleasing appearance that truly elevates curb appeal.
Even minor adjustments in color, texture, accents, and alignment can make a significant difference. By paying attention to these details during your roofing project, you’re not just protecting your home—you’re turning it into a showpiece that stands out in the neighborhood.
Common Mistakes to Avoid
Avoid these pitfalls to maintain both aesthetics and function:
-
Overlapping shingles incorrectly
-
Using too few or too many nails
-
Ignoring manufacturer guidelines
-
Installing over wet or dirty roof decking
-
Skipping underlayment or flashing
Careful attention prevents leaks, repairs, and aesthetic problems.
When to Call a Professional
Some roofs are better handled by experts:
-
Steep or complex roofs
-
Roofs with multiple valleys or dormers
-
Situations requiring heavy lifting or specialized equipment
Hiring a certified roofing contractor ensures proper installation, safety, and peace of mind with warranties.
Final Thoughts
Shingling a roof is a major but rewarding home improvement project. By following each step carefully—from preparation to installation and maintenance—you can protect your home, improve energy efficiency, and instantly boost curb appeal. With the right shingles, proper underlayment, well-planned ventilation, and routine maintenance, your roof will serve both functional and aesthetic purposes for years to come.